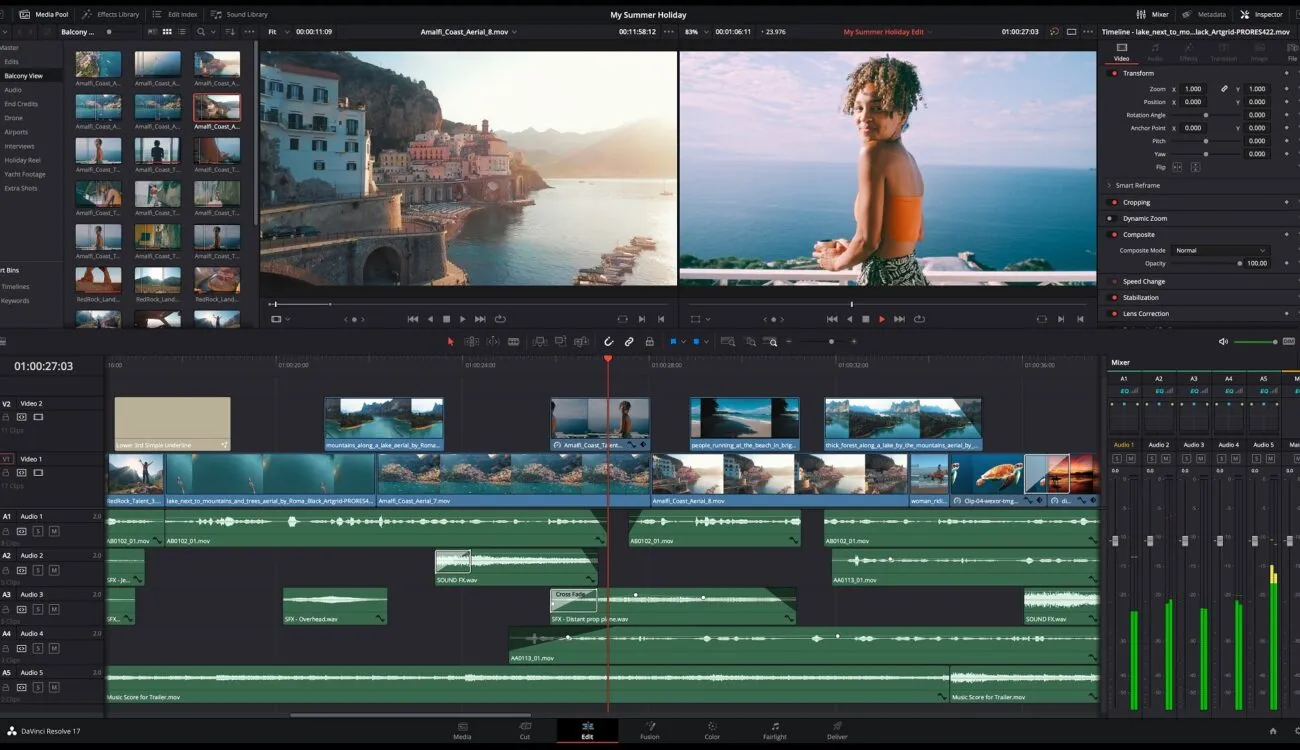
In the world of video editing, DaVinci Resolve stands out as a formidable tool, renowned for its advanced capabilities in video editing and color grading. However, users often encounter performance hurdles when working with high-resolution footage, intricate effects, or limited hardware resources. Thankfully, there are effective strategies to optimize the software’s settings, ensuring a seamless editing experience. This guide will explore essential tweaks—ranging from adjusting timeline resolutions to harnessing the full power of your GPU—that can significantly enhance playback and rendering speeds, helping you maintain a fluid workflow even on the most demanding projects.
| Optimization Technique | Description | Steps to Implement |
|---|---|---|
| Lower the timeline resolution | Reduces system overload by working with a lower resolution. | File -> Project Settings -> Master Settings -> Adjust Timeline Resolution |
Understanding DaVinci Resolve
DaVinci Resolve is a special tool that helps people edit videos and change colors to make them look better. It’s packed with many features that let you create amazing films and videos. However, sometimes, it can get a little slow, especially when you’re working with big video files or lots of effects. Don’t worry! There are simple ways to make it work faster, and I’m here to share those with you.
When you use DaVinci Resolve, you might notice that it can be tricky to manage high-resolution videos smoothly. This means the video might lag or freeze, which can be really frustrating. By understanding how to optimize the settings, you can improve how it works, making video editing more enjoyable and less stressful. Let’s dive into some tips that will help you get the best performance from this powerful tool.
Lowering Timeline Resolution
One of the first things you can do to speed up DaVinci Resolve is to lower the timeline resolution. When you work with high-resolution video, your computer has to do a lot of extra work. By temporarily changing the timeline resolution to a lower setting, you can make playback smoother. This means you can see how your video looks without the annoying lag!
To adjust the timeline resolution, go to **File -> Project Settings -> Master Settings** and choose a lower option. This simple trick can help your computer keep up with your editing tasks, allowing you to focus on making your video awesome without interruptions. Lowering the resolution is a great way to keep everything running smoothly.
Reducing Playback Resolution
Another helpful tip for improving performance in DaVinci Resolve is to reduce the playback resolution. This is similar to lowering the timeline resolution, but it focuses on how the video plays back on your screen. By selecting a lower playback resolution, your system won’t work as hard, and your video will play more smoothly, especially during editing.
To change the playback resolution, click on **Playback** in the top menu, hover over **Timeline Playback Resolution**, and choose either *Half* or *Quarter*. This small adjustment can lead to a big improvement in how your videos play back, making it easier for you to edit without waiting for the video to catch up.
Using Render Cache
Render Cache is a useful feature in DaVinci Resolve that can help speed up your editing process. When you enable Render Cache, the software saves processed frames, which means it doesn’t have to reprocess everything every time you play your video. This can be especially helpful when working with clips that have lots of effects or color corrections.
To turn on Render Cache, go to **Playback -> Render Cache** and select *Smart*. After editing, remember to delete any cached files to save space on your computer. Utilizing Render Cache can make your workflow smoother, allowing you to see your edits instantly without delays.
Generating Proxy Media
Generating proxy media is another smart way to enhance performance in DaVinci Resolve. Proxy media are lower-resolution versions of your video clips that are easier for your computer to handle. By creating these smaller files, you can edit your video more quickly, without sacrificing quality in the final product.
To generate proxy media, right-click on your clips in the Media Pool and select **Generate Proxy Media**. This will allow you to work with lighter files during editing, making it easier to see your edits in real-time. Once you’re finished, you can switch back to the original high-resolution files for the final rendering.
Optimizing Memory and GPU Settings
Optimizing your memory and GPU settings in DaVinci Resolve can make a big difference in how well your computer handles video editing. By making sure that DaVinci Resolve is using your computer’s RAM effectively, you can improve performance and reduce any lag you might experience. This is especially important for larger projects that require more resources.
To check and adjust these settings, go to **Preferences -> System -> Memory and GPU**. Here, you can tweak how much memory DaVinci Resolve uses and ensure that it’s using your best GPU. Properly configuring these settings can lead to a smoother editing experience, allowing you to work on your videos more efficiently.
Tips for Managing Cache and Proxy Files
Managing your cache and proxy files properly is crucial for maintaining a smooth editing experience in DaVinci Resolve. A lot of cached files can take up space on your computer, causing slowdowns. By regularly clearing out old cached files and organizing where you store your proxy media, you can keep your system running fast and efficiently.
To change the location of your cache and proxy files, go to **File -> Project Settings -> Working Folders**. You can store these files on a separate, faster drive to help prevent your main drive from getting cluttered. Keeping everything organized allows you to focus on your creative work without worrying about performance issues.
Frequently Asked Questions
What is DaVinci Resolve?
DaVinci Resolve is a powerful video editing and color grading software used by professionals to create stunning videos and manage color correction.
Why is my DaVinci Resolve slow?
Slow performance can occur due to high-resolution videos, many effects, complex timelines, or limited hardware. Optimizing settings can help improve playback.
How can I improve playback in DaVinci Resolve?
To enhance playback, lower the timeline resolution, reduce playback resolution, and enable render cache to lighten your system’s workload.
What does ‘Render in Place’ do?
‘Render in Place’ allows you to create a pre-rendered version of clips with heavy effects, improving playback speed and editing efficiency.
How do I manage cache files in DaVinci Resolve?
You can manage cache files by enabling render cache in the Playback menu and selecting *Smart* to save processed frames for faster playback.
What are proxy media and how do I use it?
Proxy media are lower-resolution versions of your footage that make editing smoother. You can generate them by right-clicking clips in the Media Pool.
How can I utilize my GPU effectively in DaVinci Resolve?
Ensure DaVinci Resolve is using your dedicated GPU by checking settings under Preferences and enabling options like ‘Use GPU for Blackmagic RAW decode’.
Summary
DaVinci Resolve is an advanced video editing tool that can slow down with high-resolution clips and complex effects. To improve performance, users can optimize settings for smoother playback and faster rendering. Key strategies include lowering timeline and playback resolutions, using render cache, and generating proxy media for easier editing. Additionally, storing cache on a separate drive, adjusting memory settings, and ensuring the use of a dedicated GPU can enhance efficiency. By making these adjustments, editors can enjoy a more responsive experience without sacrificing video quality, making their workflow smoother and quicker.